BYO Runners
GitHub supports two main types of runners for workflow execution:
-
GitHub-Hosted Runners
-
Self-Hosted Runners
-
RCN-Hosted Runners:
-
RCN Runners: Used for standard builds.
-
RCN LXD Runners: Designed for workloads requiring VM-like environments with a full operating system.
-
-
BYO (Bring Your Own) Runners: Self-hosted runners deployed, configured, and managed by respective teams within their own environments.
-
RCN runners are backed by Amazon EKS. When a pipeline triggers a job, RCN provisions an ephemeral runner pod to execute it, enabling simultaneous execution across multiple jobs.
This page provides high-level guidance on requesting, configuring, registering, and key considerations for Bring Your Own (BYO) runners.
Requesting a Runner Group
To request a GitHub runner group, use the self-serve template and follow these steps:
-
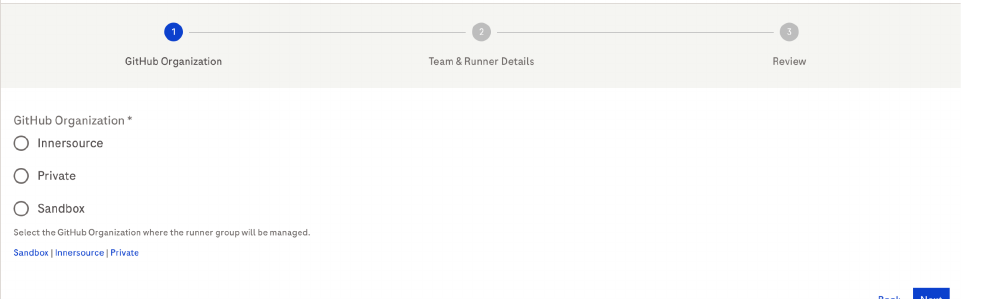
Select the GitHub Organization: Choose the organization (Innersource, Private, or Sandbox) where the repository resides.
-
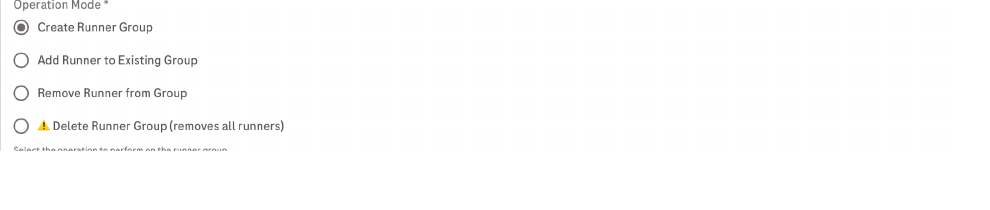
Select the Operation Mode:
-
Create Runner Group: Creates a new runner group for the specified team. Each GitHub team can have at most one runner group per organization, formatted as
{github-team}-runner-{os}-{arch}-{random4}. -
Add Runner to Existing Group: Allows teams to register additional runners under a previously created runner group.
-
Remove Runner from Group: Removes a specific runner from the team’s runner group.
-
Delete Runner Group: Deletes the runner group and removes all associated runners. Note: This action cannot be undone.
-
-
Specify the GitHub Team: Provide the pre-existing GitHub team name that will own the runner group. Any repository accessing this group must grant access to this team.
-
Specify OS and Architecture: Select the target operating system and architecture for the runner instance.
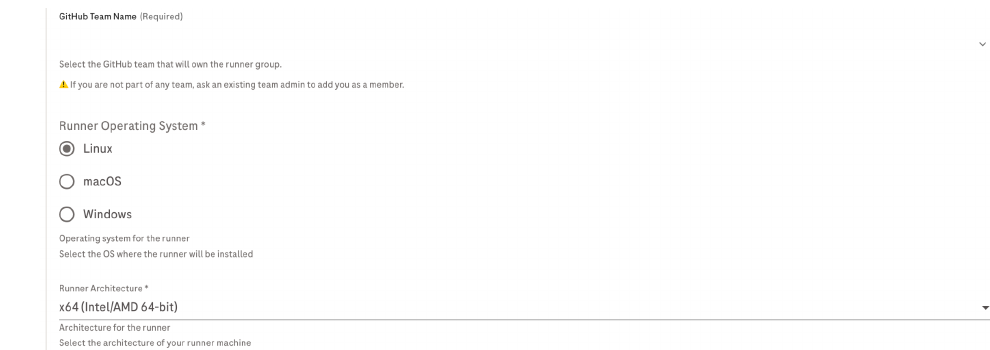
Upon submitting the request, an email with registration instructions and CI configuration details will be sent to the requestor.
Registering a BYO Runner (Example: on EC2)
This walkthrough registers a BYO runner using an EC2 instance with AWS Systems Manager (SSM) connectivity enabled as the example compute target. The same steps apply to any compute or VM that meets the Key Considerations & Requirements above.
1. Email with instructions after submitting the template
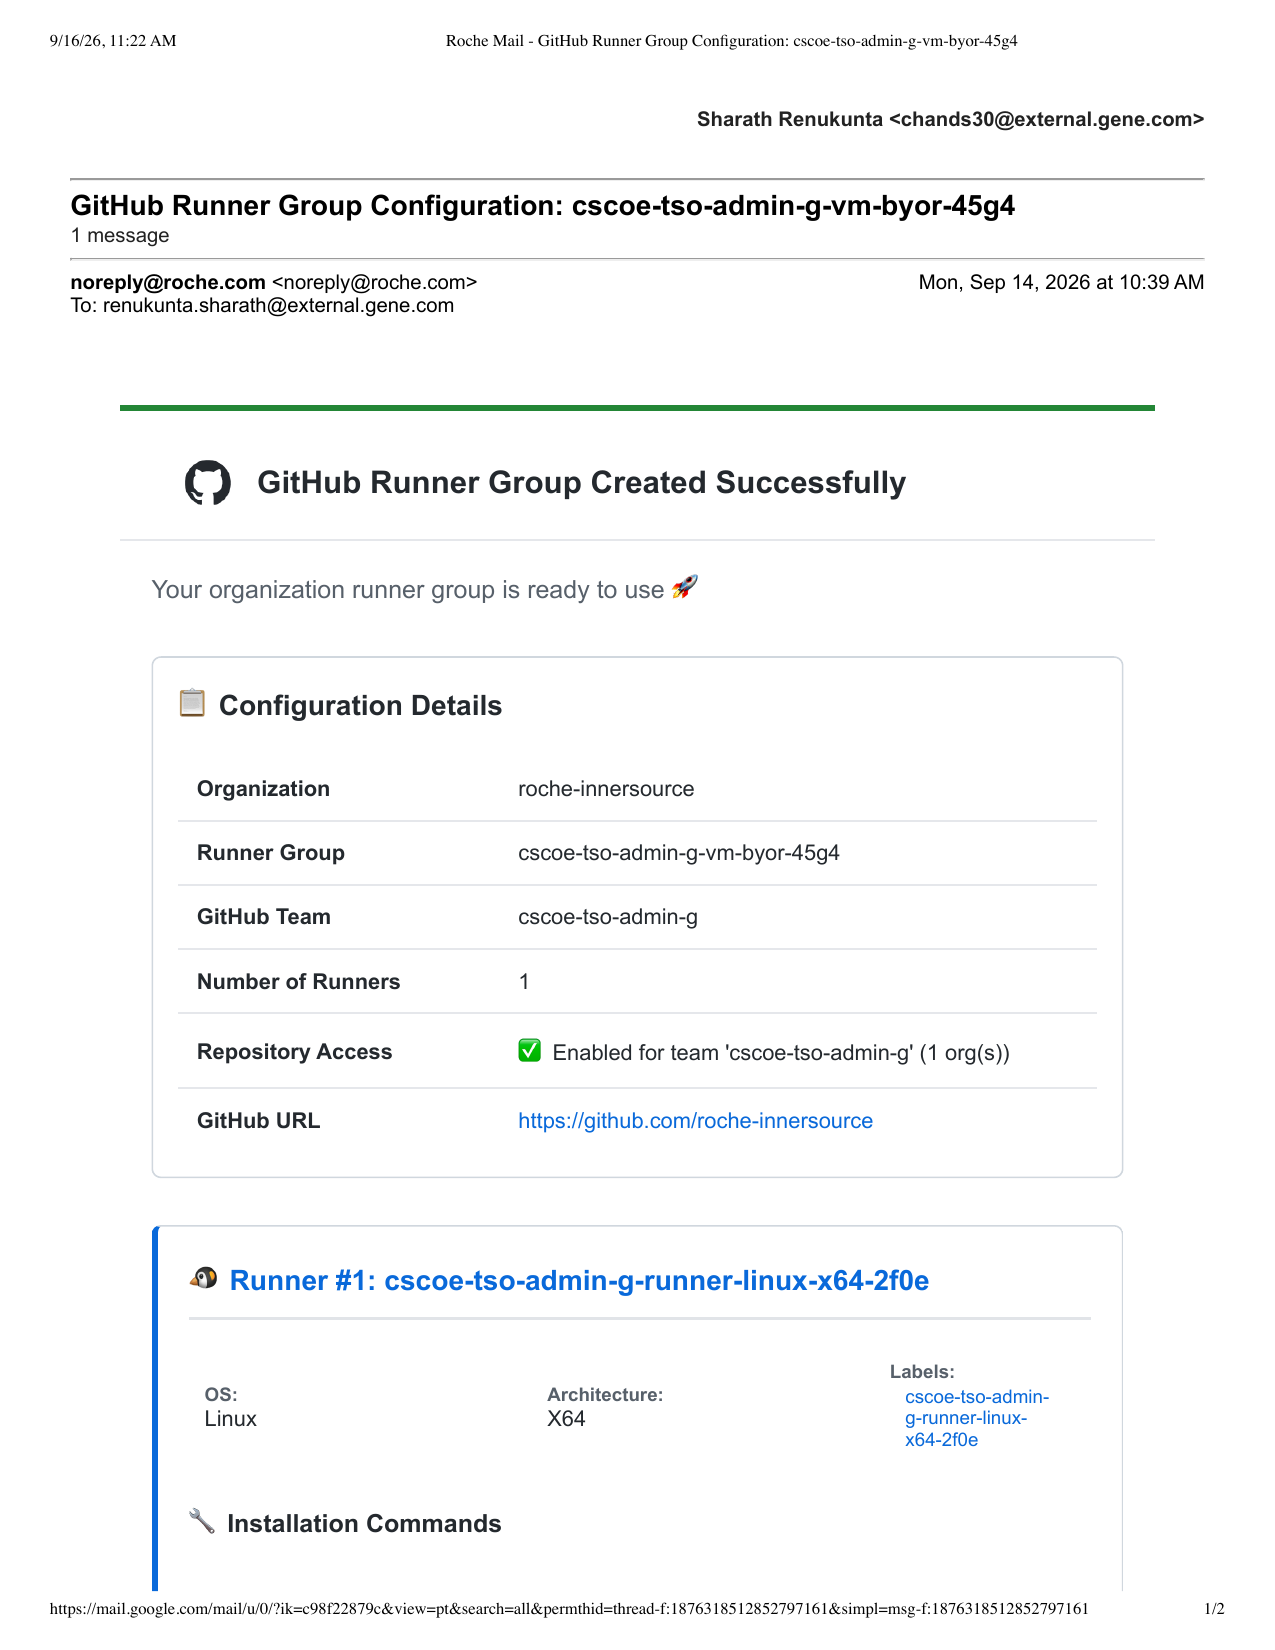
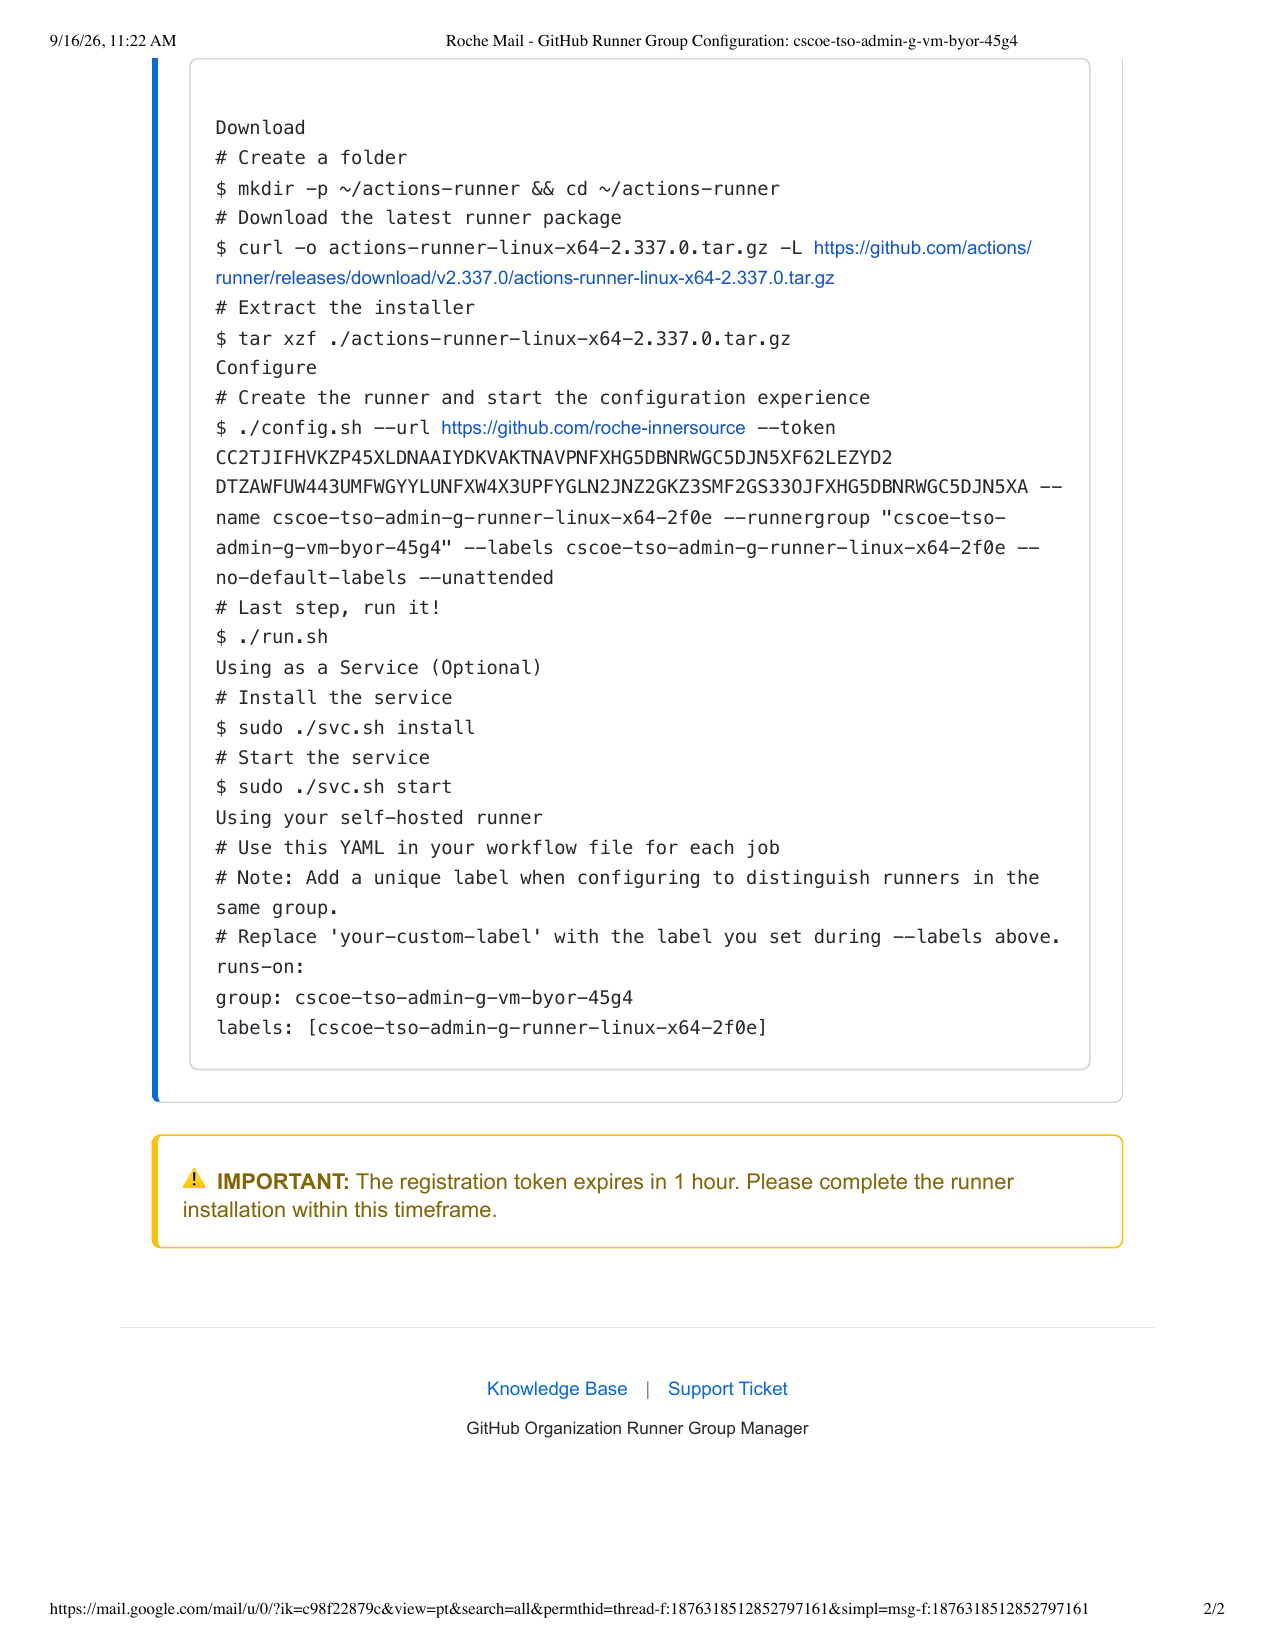
Once the self-serve runner group request template is submitted, an email is sent with the runner group configuration and instructions to register the runner, including a one-time registration token valid for only 1 hour.
Below is the email received for this demo:
|
The registration token shown in the email above has already expired and is included here for illustration only. |
Once you have received the provisioning email, connect to the instance in which you will be registering the runner.
|
For ease of use, switch to the Bash shell after connecting: |
By default, an SSM session logs in as ssm-user. Any non-root user can be used to register and run the runner — root is not supported for registering the runner. This demo uses ssm-user.
2. Install and Configure Docker
Install Docker on the instance, enable it, and add the runner user to the docker group:
sudo apt-get update
sudo apt-get install -y docker.io
sudo systemctl start docker
sudo systemctl enable docker
sudo systemctl status docker
sudo usermod -aG docker ssm-user
3. Download and Configure the Runner
Follow the instructions from the provisioning email, step by step:
mkdir -p ~/actions-runner && cd ~/actions-runner
pwd

curl -o actions-runner-linux-x64-2.337.0.tar.gz -L \
  https://github.com/actions/runner/releases/download/v2.337.0/actions-runner-linux-x64-2.337.0.tar.gz

tar xzf ./actions-runner-linux-x64-2.337.0.tar.gz

./config.sh --url https://github.com/roche-innersource \
  --token <token> \
  --name cscoe-tso-admin-g-runner-linux-x64-2f0e \
  --runnergroup "cscoe-tso-admin-g-vm-byor-45g4" \
  --labels cscoe-tso-admin-g-runner-linux-x64-2f0e \
  --no-default-labels \
  --unattended
4. Run the Runner
./run.shThis starts a foreground session for the registered runner. To run it in the background instead, install and start it as a service:
# Install the service
sudo ./svc.sh install

# Start the service
sudo ./svc.sh start
5. Grant Repository Access
For a repository to use this runner, the GitHub team that owns the runner group must have Write (or Contributor) permission on that repository. Once access is granted, reference the runner group and label in the workflow:
runs-on:
  group: cscoe-tso-admin-g-vm-byor-45g4
  labels: [cscoe-tso-admin-g-runner-linux-x64-2f0e]
Key Considerations & Requirements
-
Docker Installation: Ensure Docker is installed on the target VM.
-
Non-Root Execution: GitHub blocks root usage by default to mitigate security risks. Do not execute the runner setup script (
config.sh) as the root user. -
Docker Socket Permissions: The user running the setup must have access to the Docker daemon socket (
/var/run/docker.sock). Ensure the OS user who registered the runner with, is added to the docker group:sudo usermod -aG docker <OS-user-registered-the-runner> sudo systemctl restart actions.runner.* -
Repository Access Permissions: The runner group owning github team must have at least Write or Contributor access to the target repository to utilize its runner group.
Example: If repository
repo-to-use-runneruses groupcscoe-tso-test-runner-group-sdjv(owned by teamcscoe-tso-test-runner), thencscoe-tso-test-runnermust have Write or Contributor permissions onrepo-to-use-runner. -
Group Limits: A GitHub team can own only one runner group per organization.
-
Registration Expiration: The registration token received via email expires after 1 hour. Configuration commands must be executed on the instance within this window.
-
Automatic Repository Linking: All repositories accessible to the GitHub team within the target organization are linked automatically. New repositories assigned to the team inherit access without requiring manual updates.
-
Automated Cleanup: Runner groups with no registered runs are automatically pruned every Sunday at 02:00 UTC.
Design Principles for BYO Runners
-
Outbound-Only Connectivity: Runners poll GitHub Enterprise over HTTPS; no inbound firewall rules are required on your infrastructure.
-
Runner Group Isolation: Each team’s runners are scoped to a dedicated runner group to prevent cross-team job execution.
-
Platform-Managed Access: Runner group access automatically extends to all repositories granted to the owning team within the organization.
-
Runner Lifecycle Ownership: Teams are responsible for provisioning, scaling, patching, and decommissioning runner agents on their own infrastructure.
For additional information regarding runner type selection, limitations, and best practices, refer to the DevHub CI/CD & Automation Documentation.